Putting it all together - a more complex example
In this tutorial, we’ll combine all the things we’ve learned in the previous tutorials into a single example.
An experience DevMate user with be able to configure what you see below in less than 10 minutes. If you’re learning, it will take longer.
The approach would be slightly different if you are using TDD, but DevMate is even more applicable and helpful for TDD, being a requirements led, Black Box Testing tool.
Requirements
We offer credit to people as follows.
Age | Maximum Credit $ | Maximum Duration (months) |
|---|---|---|
< 18 | No credit available | n/a |
>=18 to <=25 | 1,000 | 24 |
>=26 | 10,000 | 48 |
These requirements could certainly be improved, but we want to focus on DevMate usage rather than precise requirements and definitions.
The Code
You can find the code relating to this tutorial on Github in the /java/util/alltogether folder.
The AllTogether() constructor expects a date of birth and a name.
public AllTogether(DateTime dob, String name) {
    DateTime now = new DateTime();
    Period period = new Period(dob, now);
    this.age = period.getYears();
    this.name = name;
}We then have a method validatePerson(), which handles the validation of the AllTogether object. It throws an Exception if any validation fails.
    public void validatePerson() throws Exception {
        // Check basic properties
        if(name.length()<2) {
            throw new Exception("Invalid name");
        }
        if(age<=0) {
            throw new Exception("Invalid age");
        }
        // Check not too young
        if(this.age < 18) {
            throw new Exception("Too young");
        }
}The checkCredit() method checks whether the instantiated person is able to have credit, based on the amount of credit sought and the duration, in months, of the credit.
public CreditReturnStatus checkCredit(int creditSought, int duration) {
    CreditReturnStatus response = new CreditReturnStatus();
    response.approved = false;

    if (age < 26) {
        if(creditSought > 1000) {
            response.message = "We only offer up to 1000 of credit between 18 and 25";
            return response;
        }
        if(duration > 24) {
            response.message = "We offer max 24 months of credit between 18 and 25";
            return response;
        }
    }
    else {
        if(creditSought > 10000) {
            response.message = "We only offer up to 10000 of credit";
            return response;
        }
        if(duration > 48) {
            response.message = "We offer max 48 months of credit";
            return response;
        }
    }
    response.approved = true;
    response.message = this.name + " : your credit has been approved";
    return response;
}
class CreditReturnStatus {
    public boolean approved;
    public String message;
}Note that this returns a CreditReturnStatus object. We've done it this way so we can demonstrate the use of a Custom Assertion in this tutorial.
Pragmatism
This example looks, on the face it it, quite trivial. However, if we were to define all Equivalence Classes and Boundary Values into a single case, it would create an enormous number of automatically generated test cases. This would make the process of configuring the test very lengthy and would therefore run the risk of not being done at all.
There are times where you will want to be exhaustive and there are times when you want to be pragmatic. We are going to be pragmatic here and take an approach that makes it very simple to implement an excellent test. It might not cover every possible case, but it does a great job with very little setup.
Two Scenarios
The main way to simplify this problem is to break it down into two Scenarios within our test definition.
Test the instantiation and validation of valid and invalid Equivalence Classes for the constructor, using the
validatePerson()method.Test the
checkCredit()method with validate objects only.
Scenario 1 - Instantiation
Let’s reconfigure the default Scenario1. Once you’re familiar with DevMate, this will only take about three or four minutes.
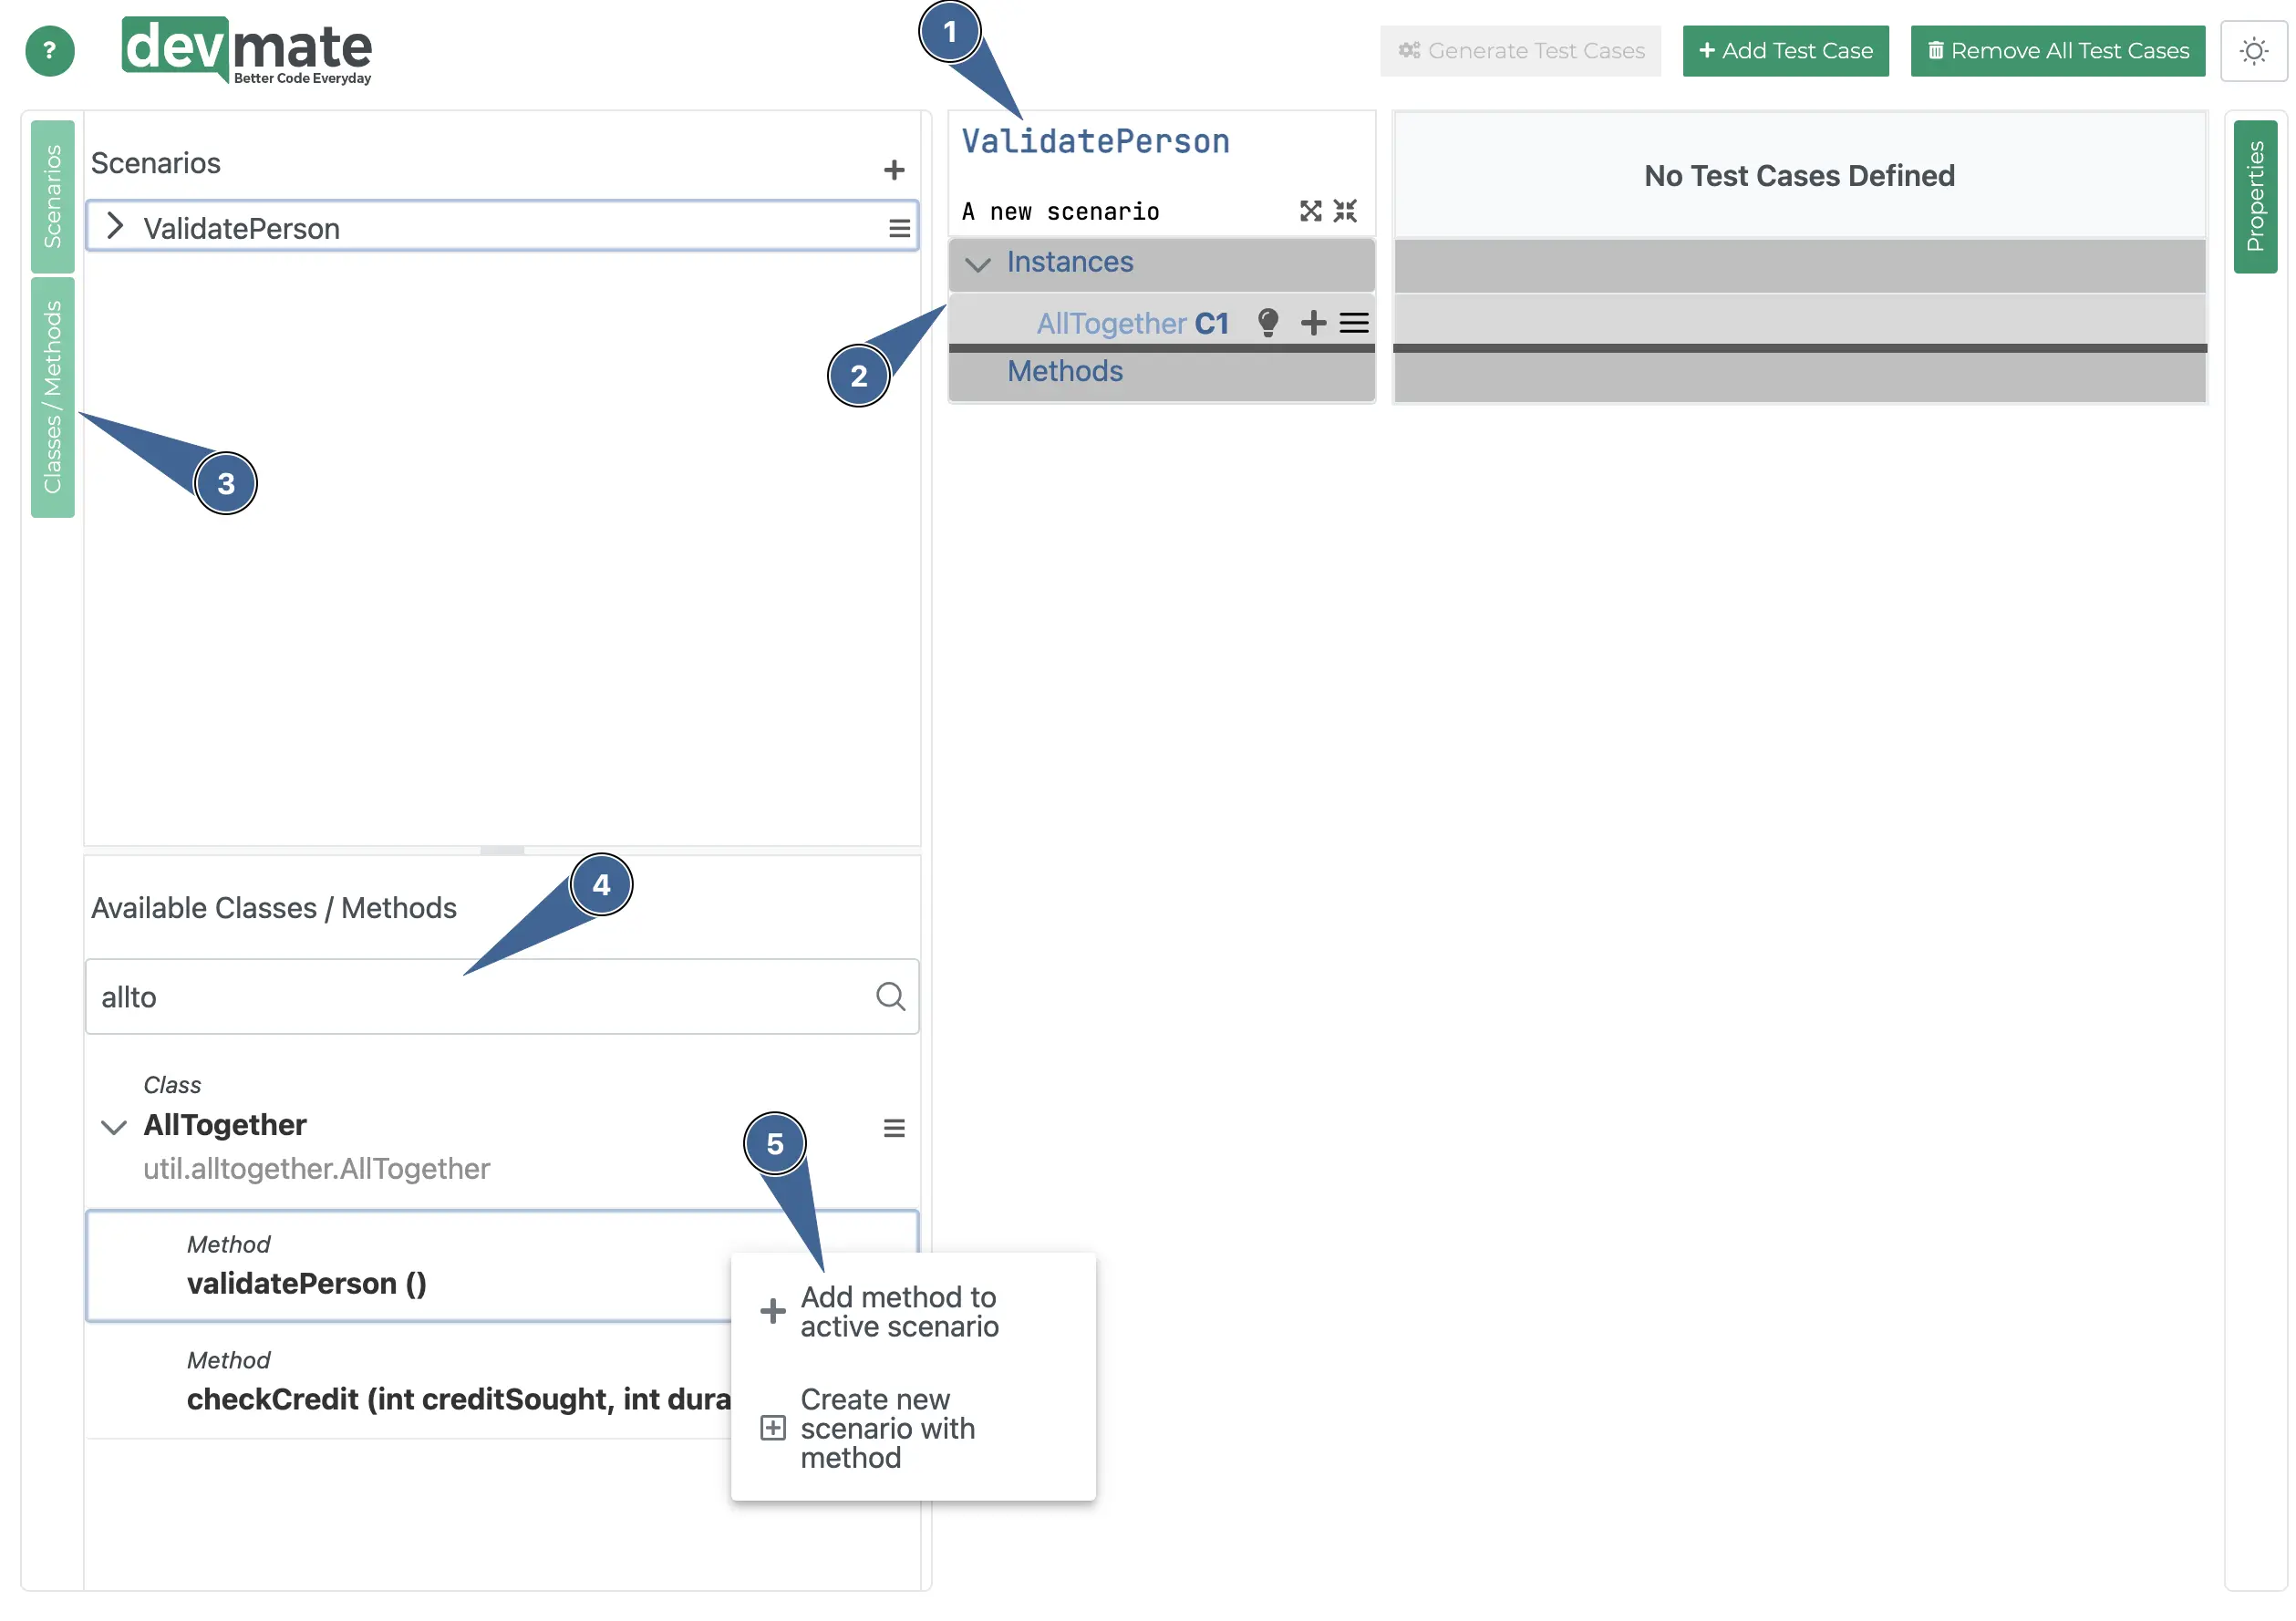
Rename from Scenario1 to ValidatePerson.
Depending on whether the DevMate recommendation engine has inserted suggested default, you may see auto-created Equivalence Classes. Remove them all so you can follow these step easier. Also remove any Method that might have been auto-inserted.
Click on the Classes/Methods tab.
Enter “alltogether” in the search field.
Right click on
validatePerson()and add it to the active scenario.
We can now fully configure the validatePerson scenario.
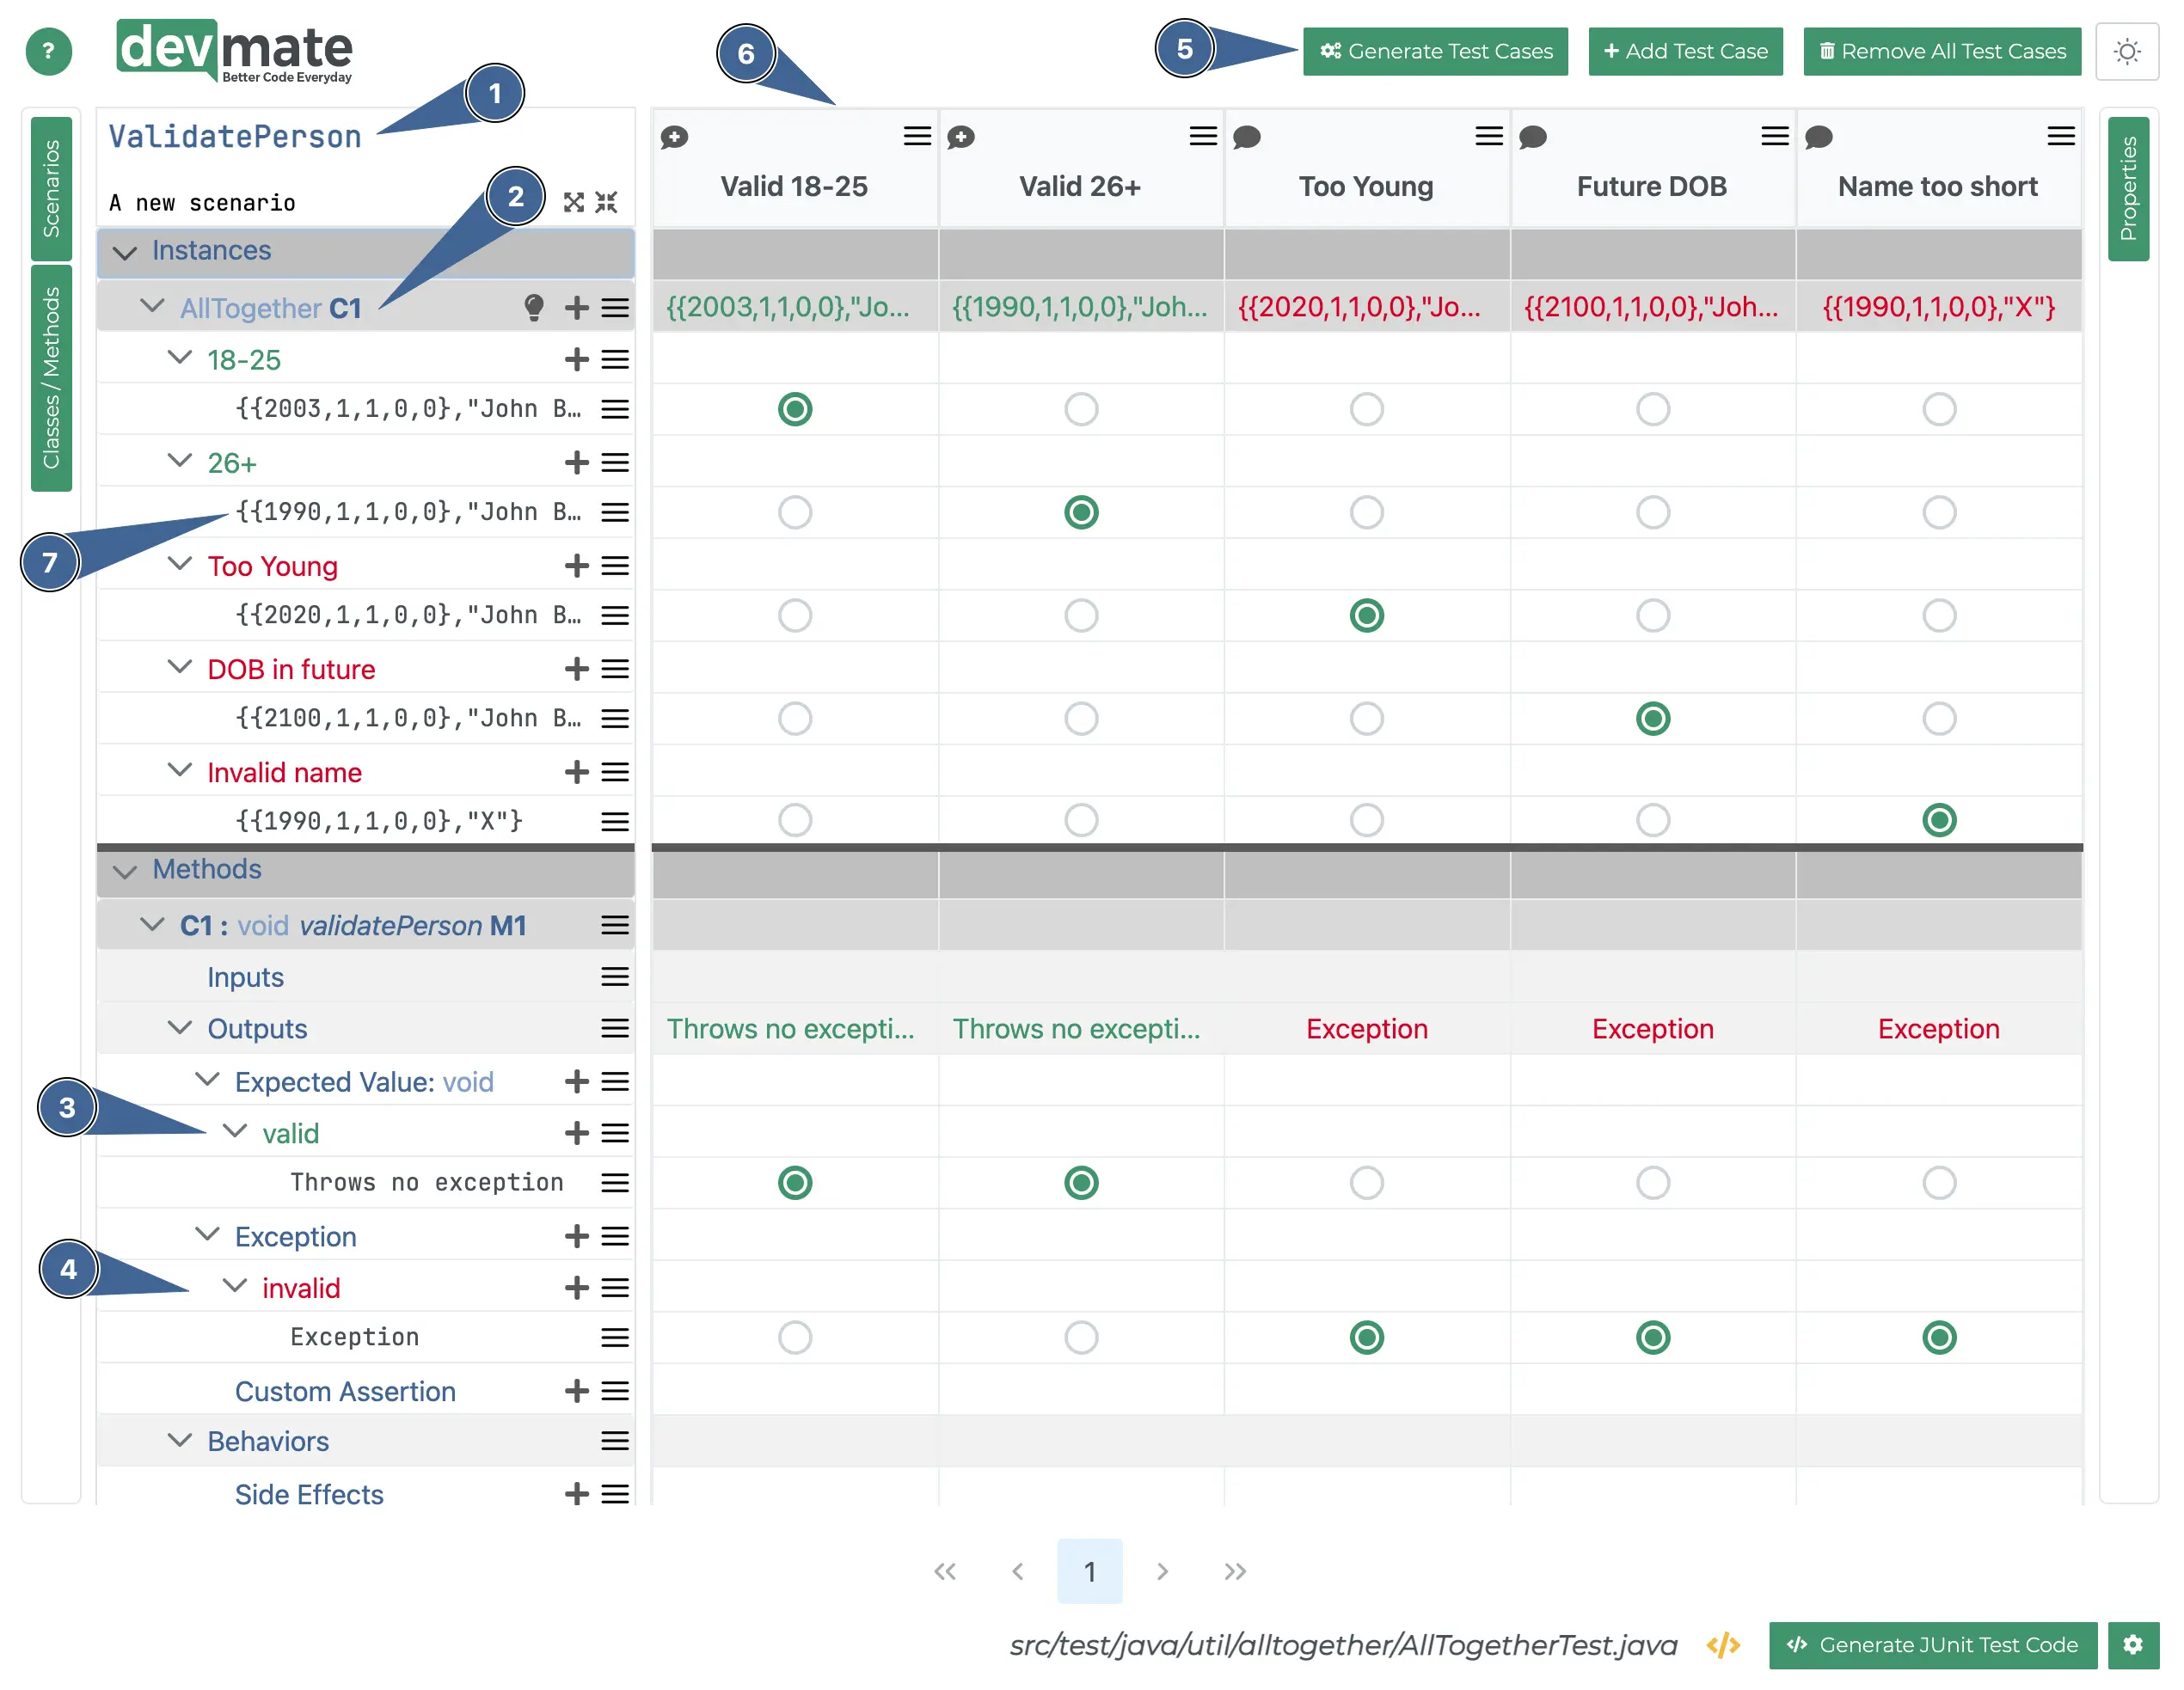
Rename the Scenario to something clear if not already done.
We have defined five Equivalence Classes. Please refer below to Instantiating using the Constructor to see how we do this.
Add a valid Equivalence Class to the Expected Value output.
Add an invalid Equivalence Class to the Exception output.
Now press Generate Test Cases.
Rename the test cases. You don’t have to do this, but it makes things much clearer for anyone looking at this in the future.
We have instantiated
AllTogetherusing its constructor. See below for an explanation.
Instantiating using the constructor
When you add a Representative to any of the Equivalence Classes, you the following dialog appears.
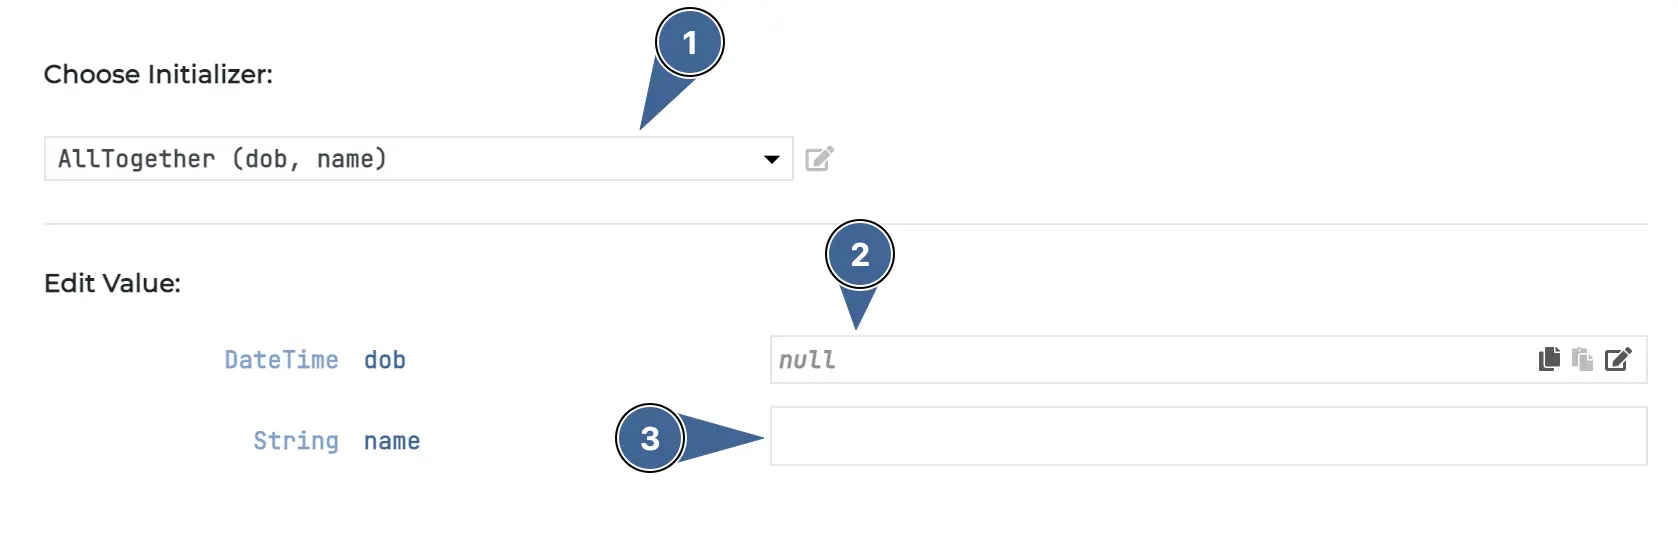
This will initially contain
null. You should select the dropdown and choose theAllTogether()constructor, after which you will see the constructor's two properties.The
dobproperty is an object. It will initially containnull, but we will need to configure the date of birth we want to use for the selected Equivalence Class.The
nameis also currently empty and needs attention. You can do this now or later.
Let’s configure these property values. Double click on the dob field or press the pencil icon.
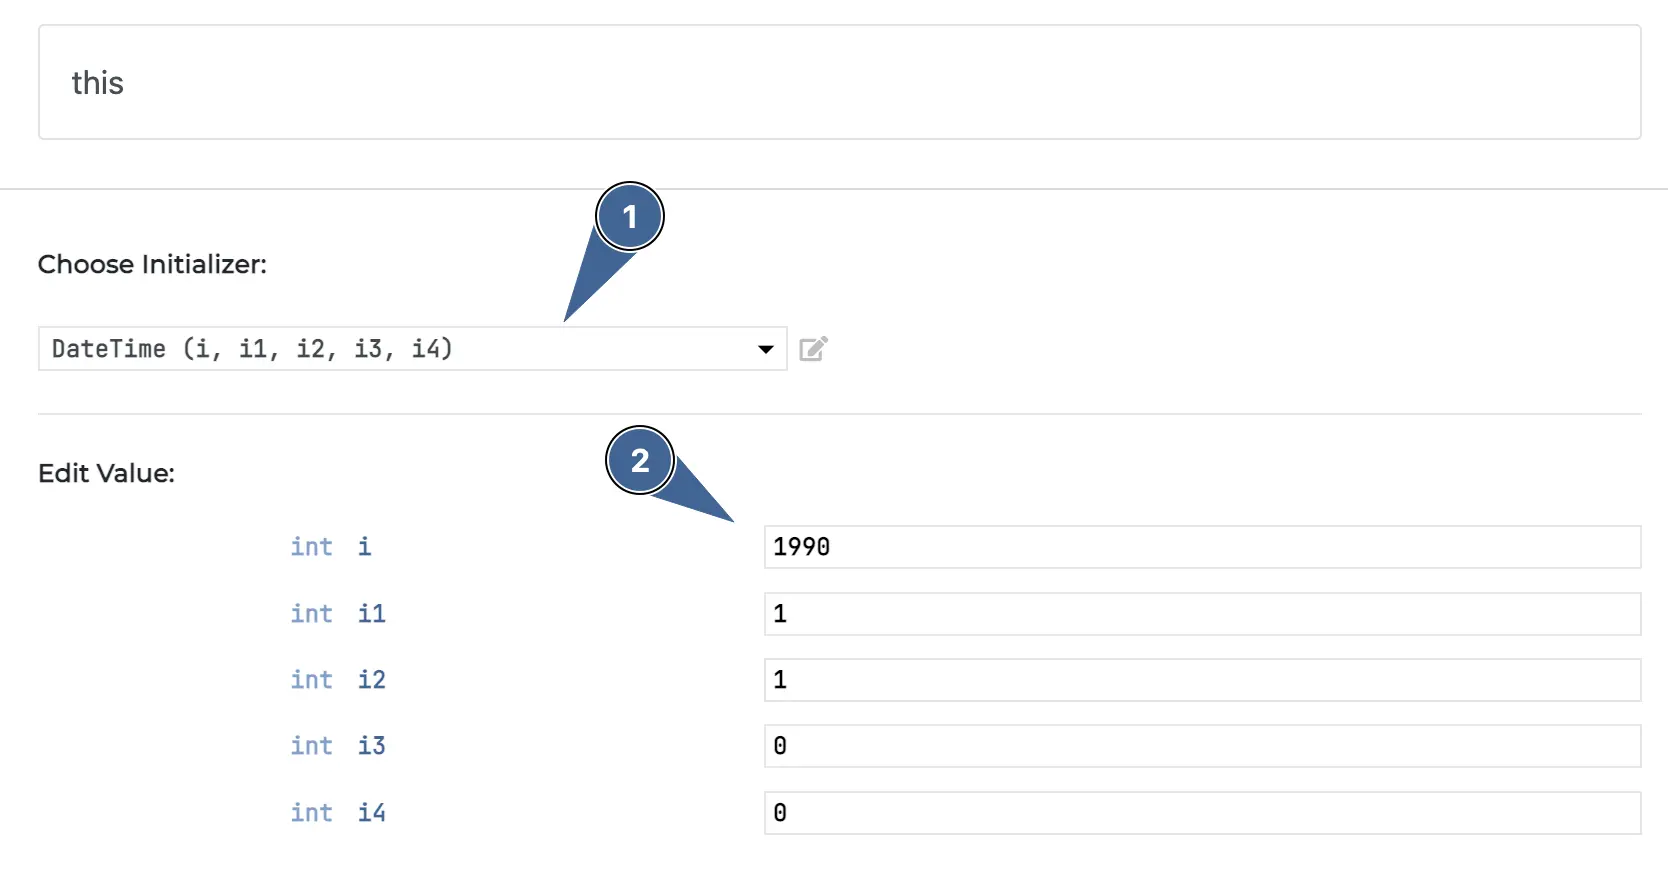
This dropdown will initially contain
null. Select it and choose the constructor you want to use. Select the one shown above.The corresponding arguments are then shown below. You should complete them (year, month, day). We are using the Joda library. Months and days are 1-based.
Press the Prev button (not shown above) and make sure the
nameparameter is appropriately filled, then press Save.You should now see the value saved in the main editor.
You can edit the values at any time.
Scenario 2 - Check Credit
With the validity covered in the first scenario, all we need to do now is to define Equivalence Classes for checkCredit() and only for valid instances.
Click on the Scenarios tab on the left of the editor.
Add a new Scenario and rename it to CheckCredit.
DevMate might copy the ValidatePerson scenario. In this case, please remove all Equivalence Classes, as we want to configure them afresh.
From the Methods/Classes tab on the left, search for and add
checkCredit()to our new Scenario. You can follow the same steps we showed when setting up Scenario1 - Instantiation.
We should now configure our Equivalence Classes as shown below. Note that we are only instantiating valid AllTogether objects as we tested the invalid cases in the first Scenario.
Inputs
Let’s configure the Instance Equivalence Classes and Input Equivalence Classes to start with. Ignore the test cases for now.
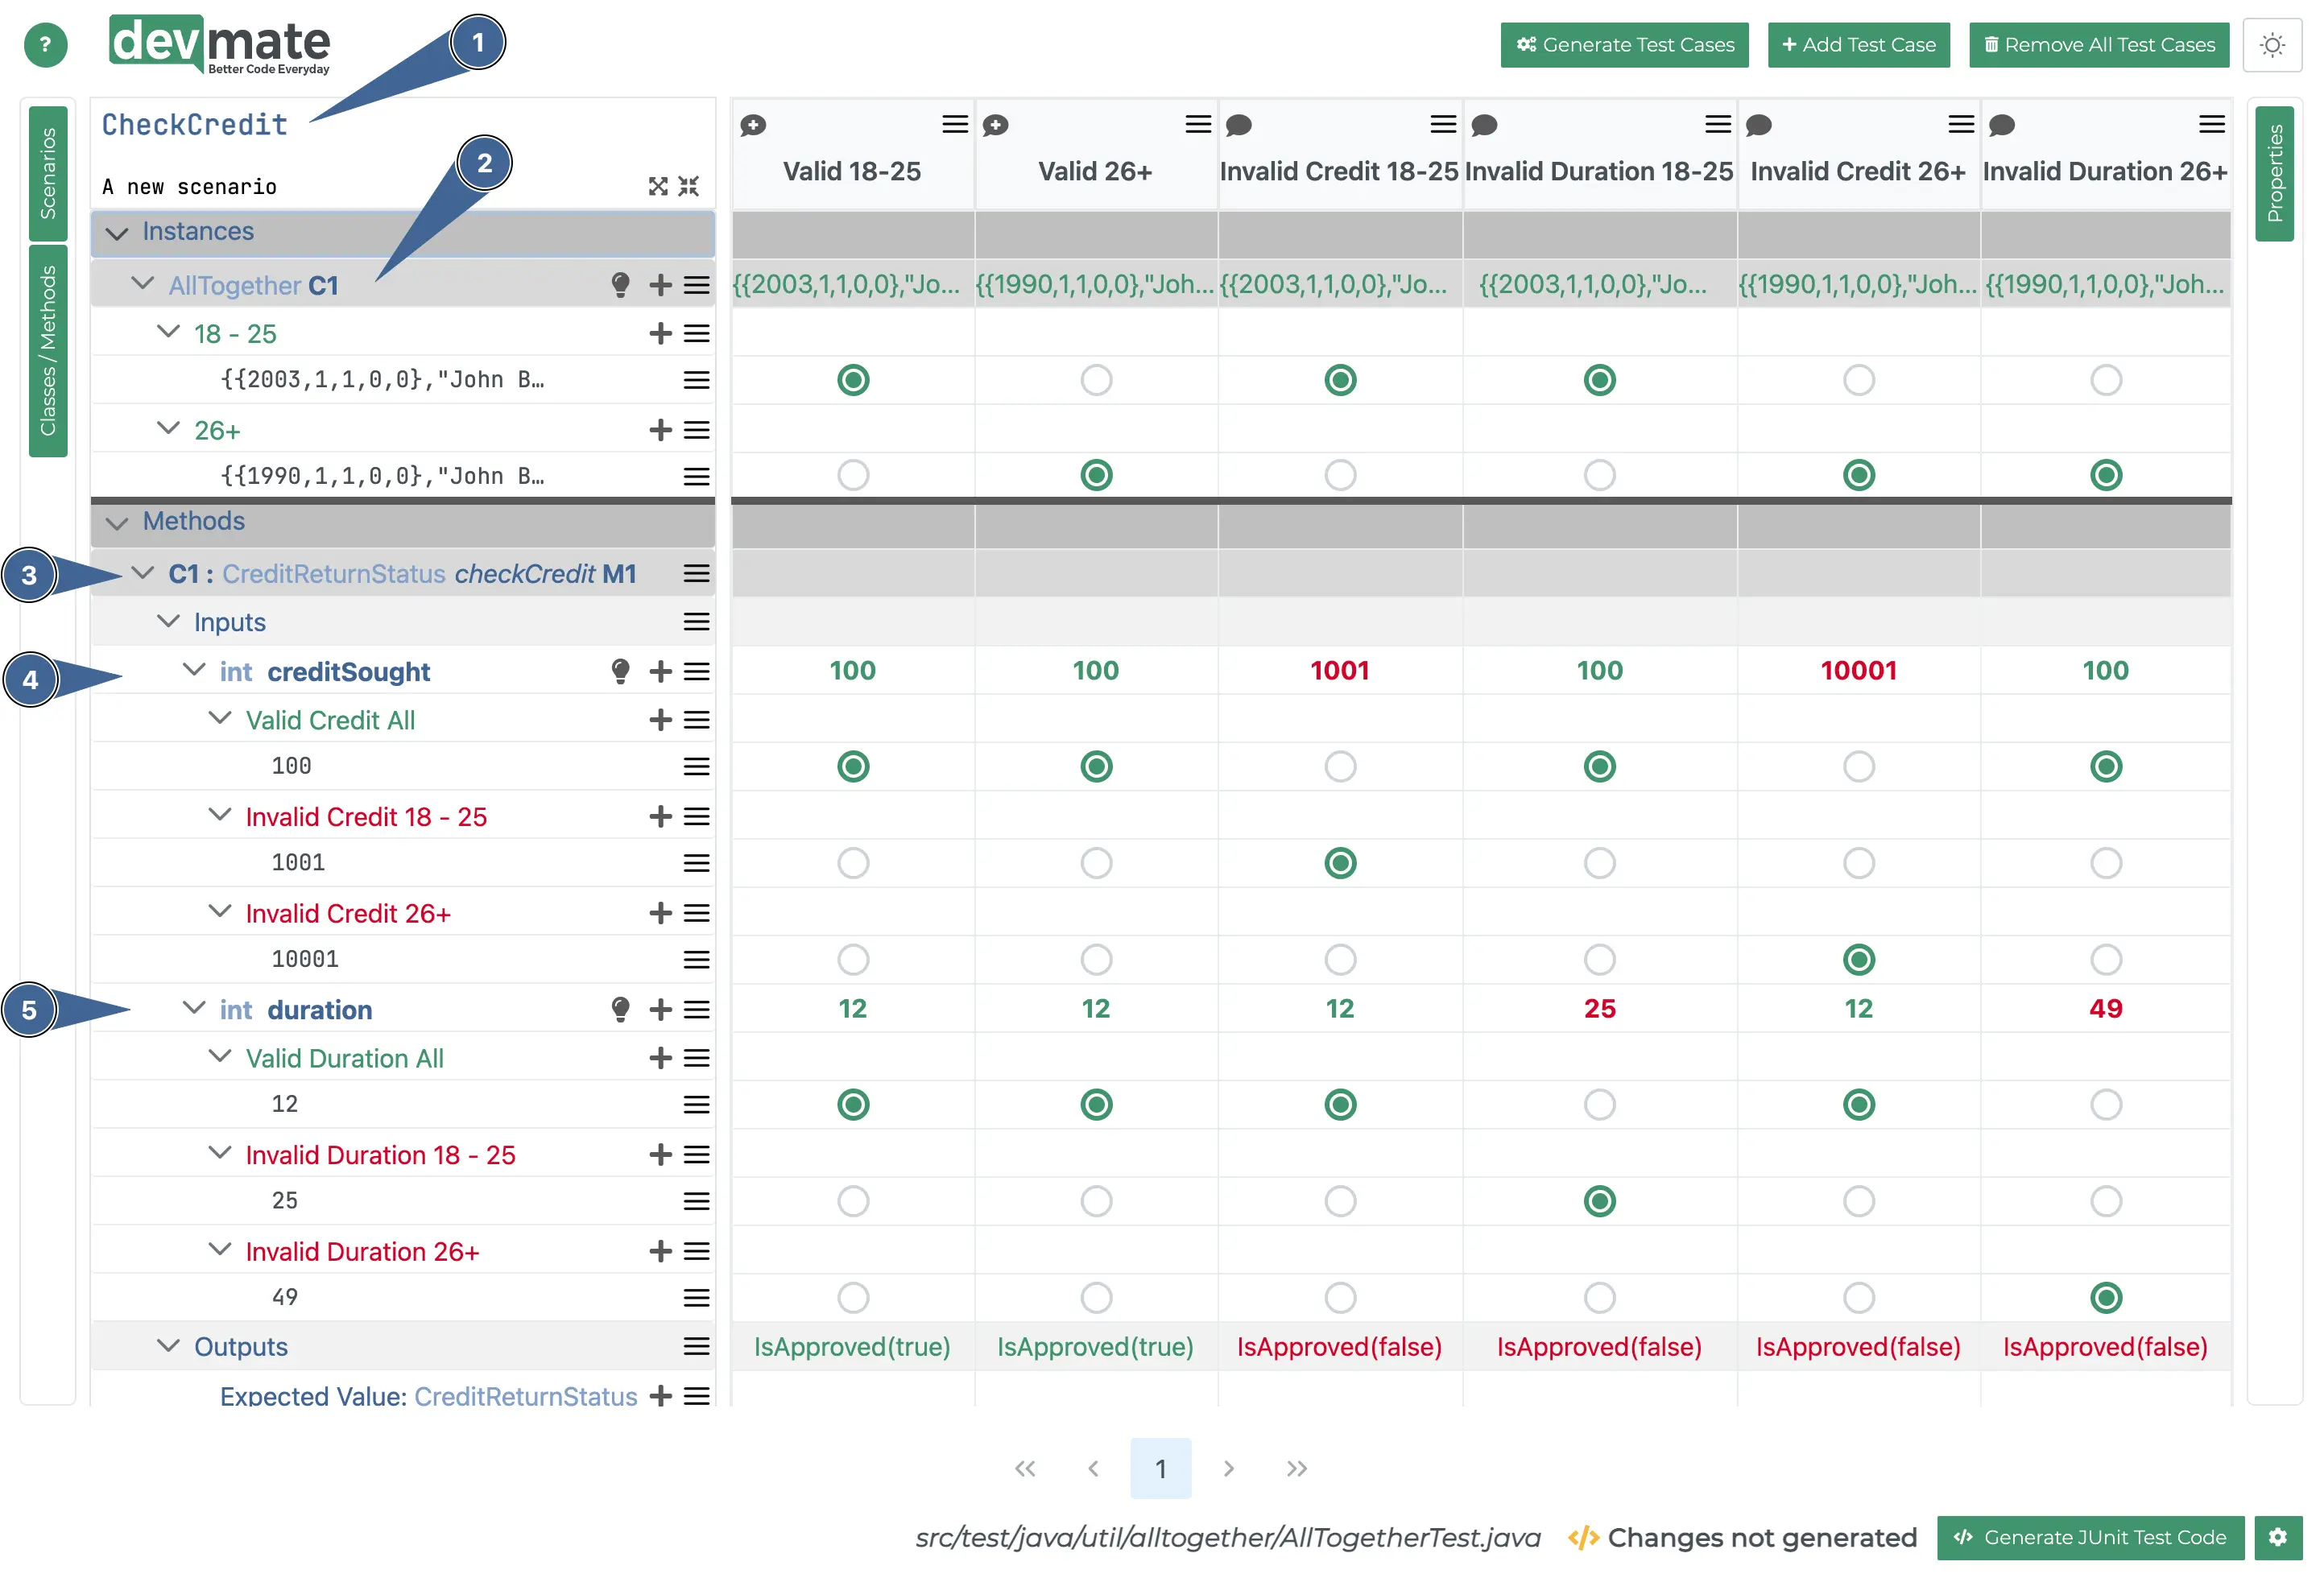
We’ve renamed the Scenario for readability.
We create the two valid Equivalence Classes we need. Note that we set the date of birth appropriately to be within the indicated age ranges. Please refer to Instantiating using the Constructor as a reminder.
Here’s the
checkCredit()method we're testing.We need to provide the Equivalence Classes for the
creditSoughtparameter. Note that we have chosen invalid values just above the valid credit boundaries we specified in the requirements at the top of the page.We do the same for the
durationparameter.
Outputs
Let's configure our Outputs.
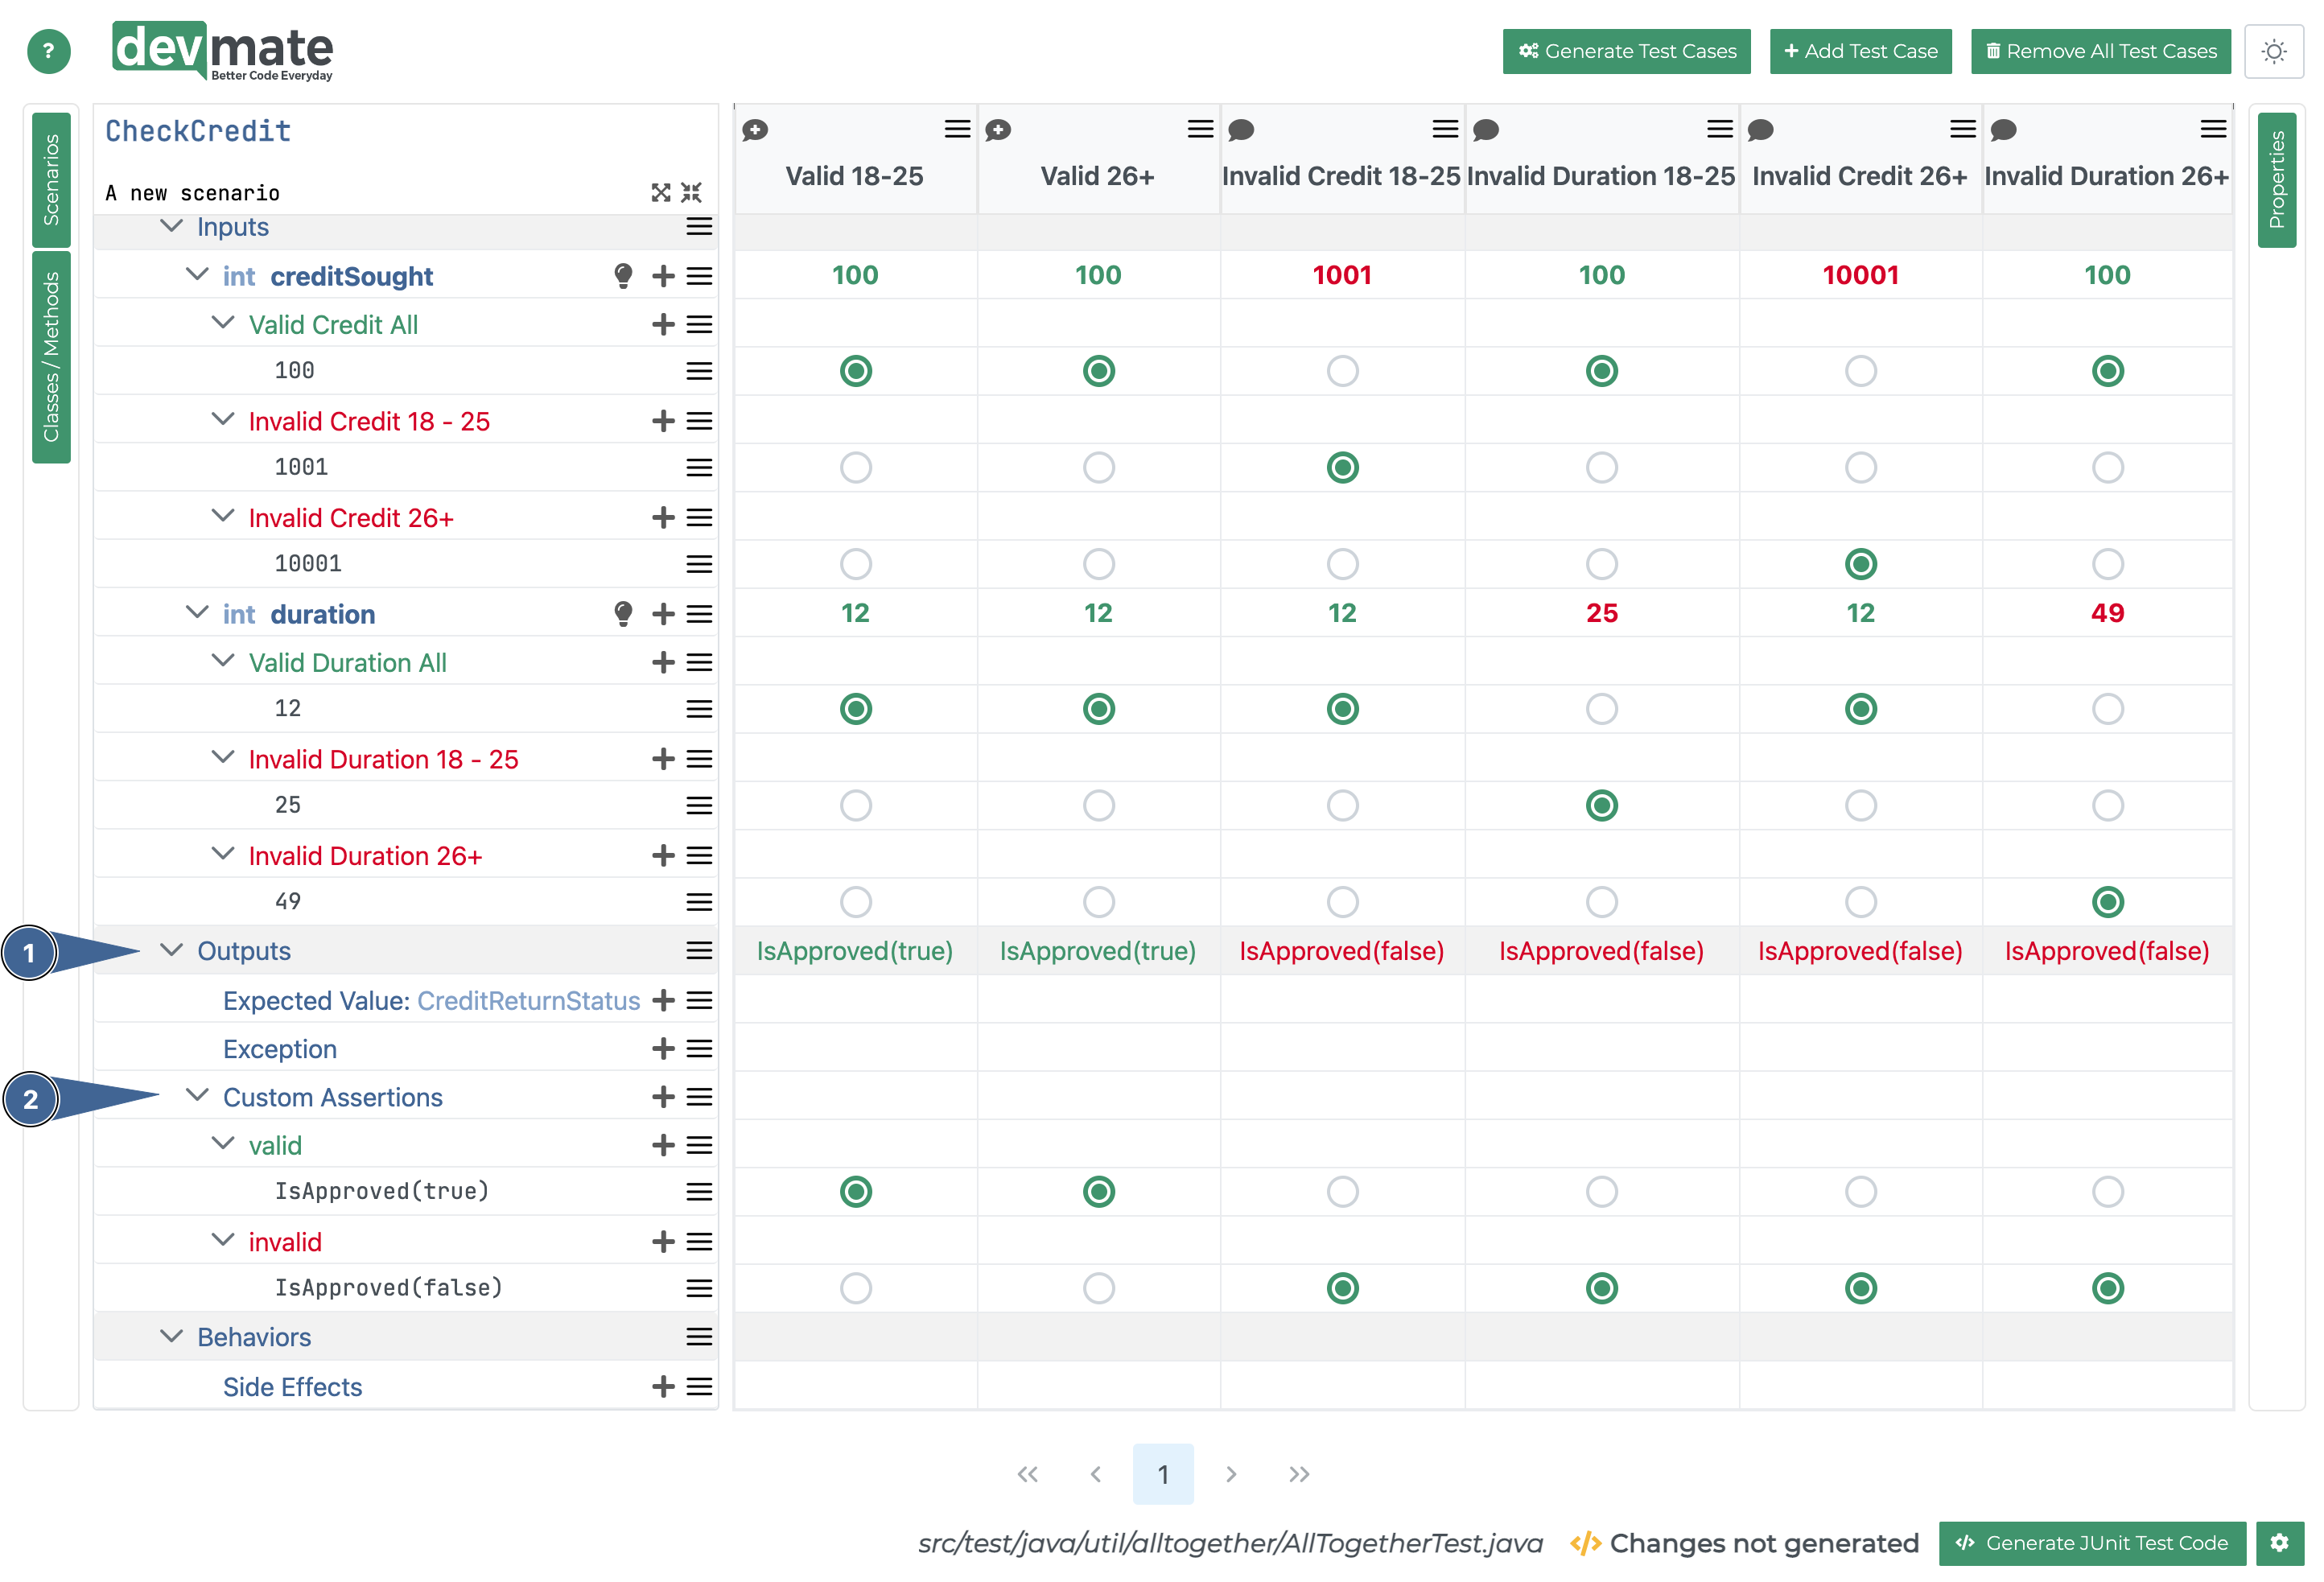
Here’s the Outputs section.
We are going to use a Custom Assertion to make things more interesting. Add a valid and an invalid Equivalence Class under Custom Assertions as we’ll describe next.
Note that checkMethod() returns a CreditReturnStatus object.
class CreditReturnStatus {
    public boolean approved;
    public String message;
}To process this, we need to write a very simple Custom Assertion Factory method. It will be a one-liner.
Add a Representative to the valid Equivalence Class (+ icon next to valid). As soon as you have done this, a dialog appears.
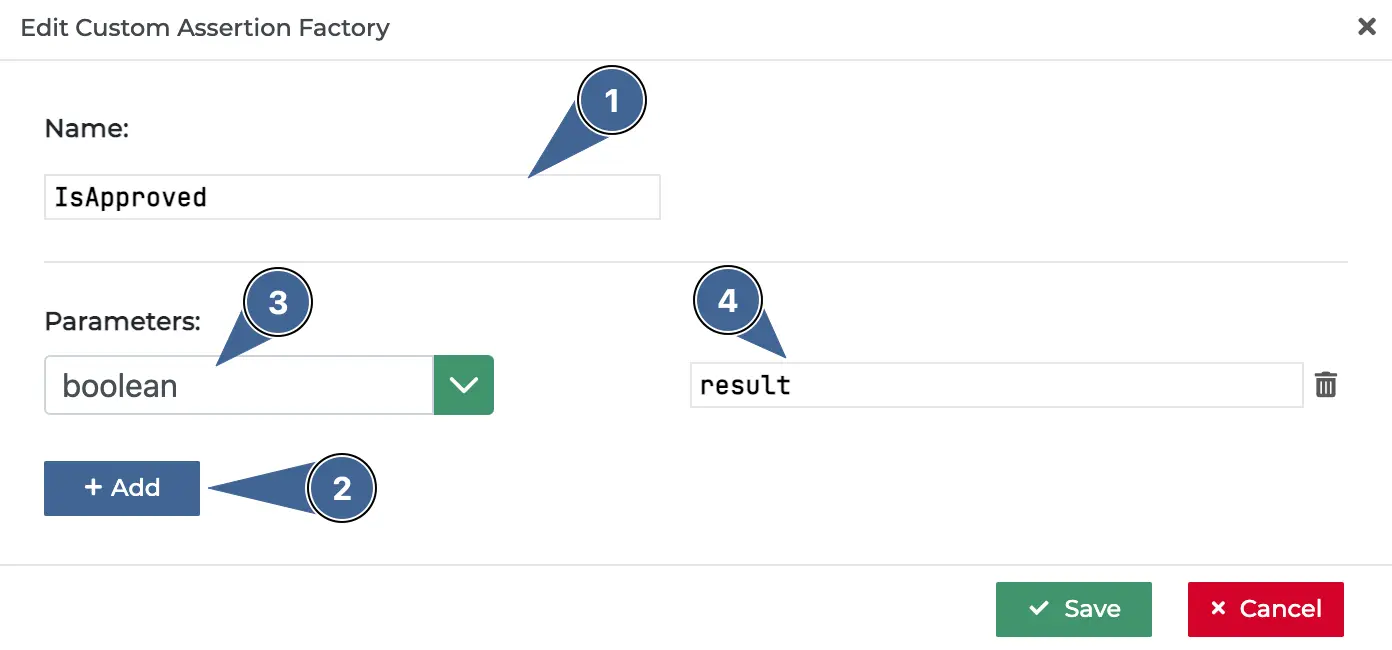
The dropdown will initially contain
null. Select it and choose Add New Custom Assertion Factory from the list. As soon as you do so, the dialog is reconfigured as shown. Change Name toIsApproved.Click the Add button to add a new parameter.
Give it the type
booleanName the parameter
result.
We could have created an IsApproved Custom Assertion (for handling just the approved case) and a separate one IsRejected (for handling just the not approved case). However, this would require two discreet methods. We’ll manage it with the single one we've configured here and use a parameter to differentiate between approved and rejected.
For the Representatives for both valid and invalid, you can choose the IsApproved() method from the dropdown and the appropriate parameter - true/false.
Generate Test Cases
Now we’re all done with the configuration, we’re ready to generate our test cases.
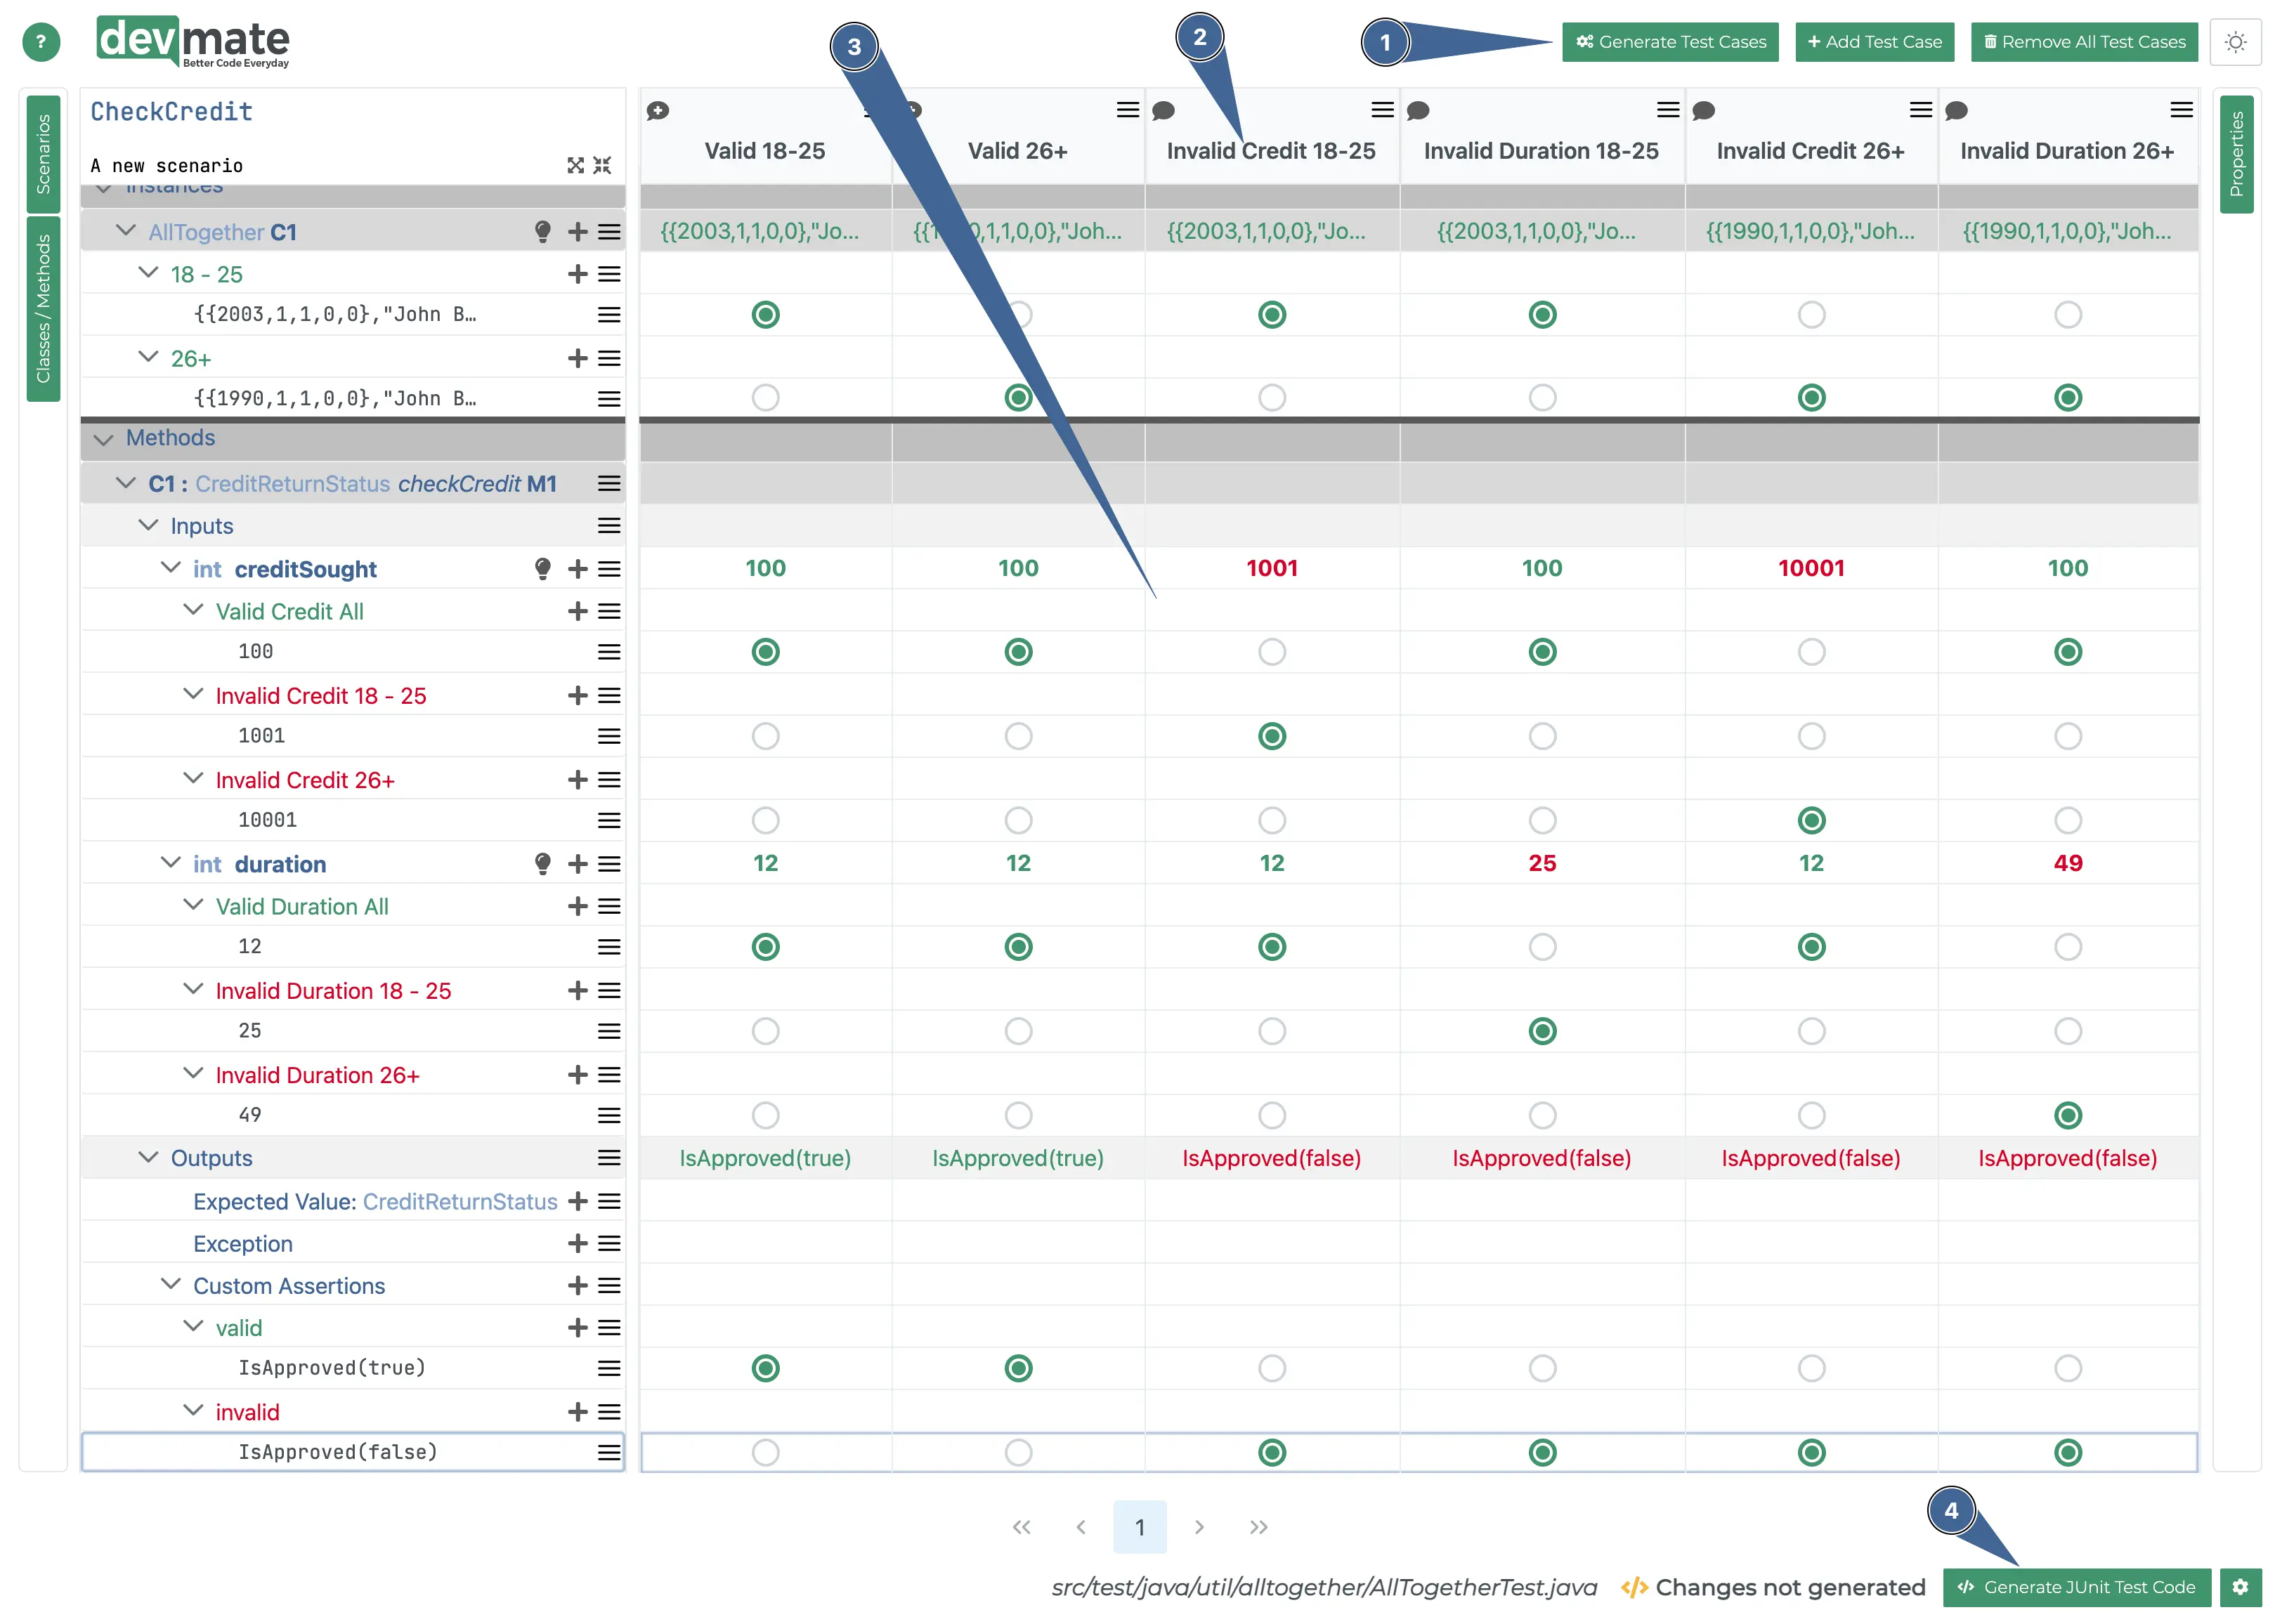
Press Generate Test Cases to create the test cases, which DevMate will do for you automatically.
Rename each of the test cases to something like you see above. This is great for documenting nicely for the benefit of others, especially future members of the product team.
You can now select the Representatives to use for each test case. DevMate will make some suggestions for you. You should check each test case, especially the
checkCredit()parameters and the Outputs. You should end up with the configuration shown above.You can now press Generate Test Code.
Test Code
Custom Assertion Factory
In the previous step, we configured the Custom Assertion Factory IsApproved to manage our output check. We now need to add the assertion code. It’s a one liner.
Near the top of the test file, you will initially see this placeholder code.
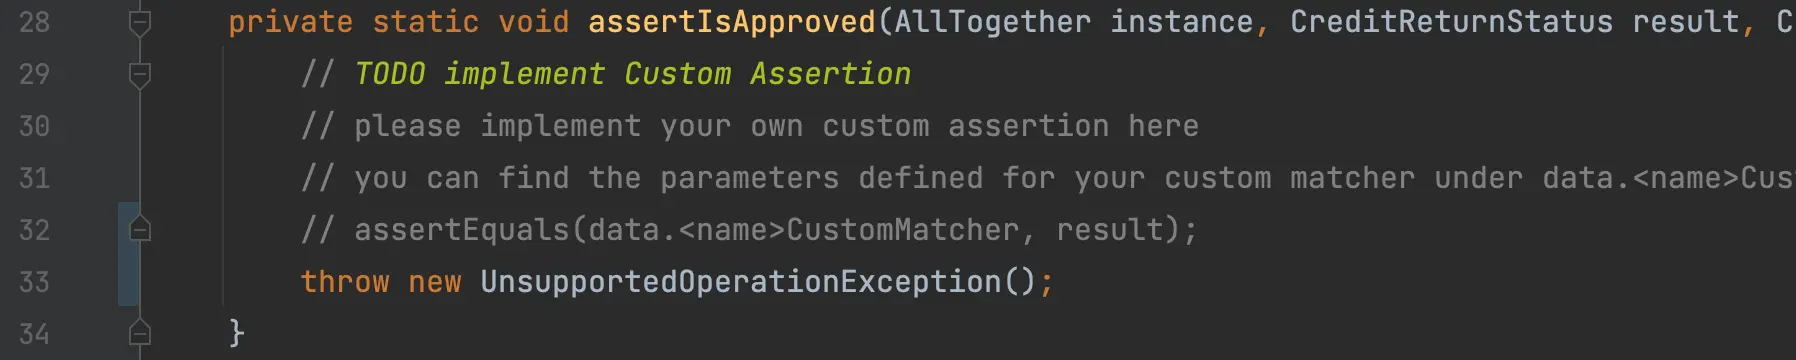
You should edit the body to be as follows.
	private static void assertIsApproved(AllTogether instance, CreditReturnStatus result, CustomMatcherIsApprovedTestData data) {
		assertEquals(data.resultCustomMatcher, result.approved);
}Test Code
The entire test, it really very simple. It’s only the top lines of the code that it is of interest. Everything further down is boilerplate code for running parameterized tests and you can ignore it.
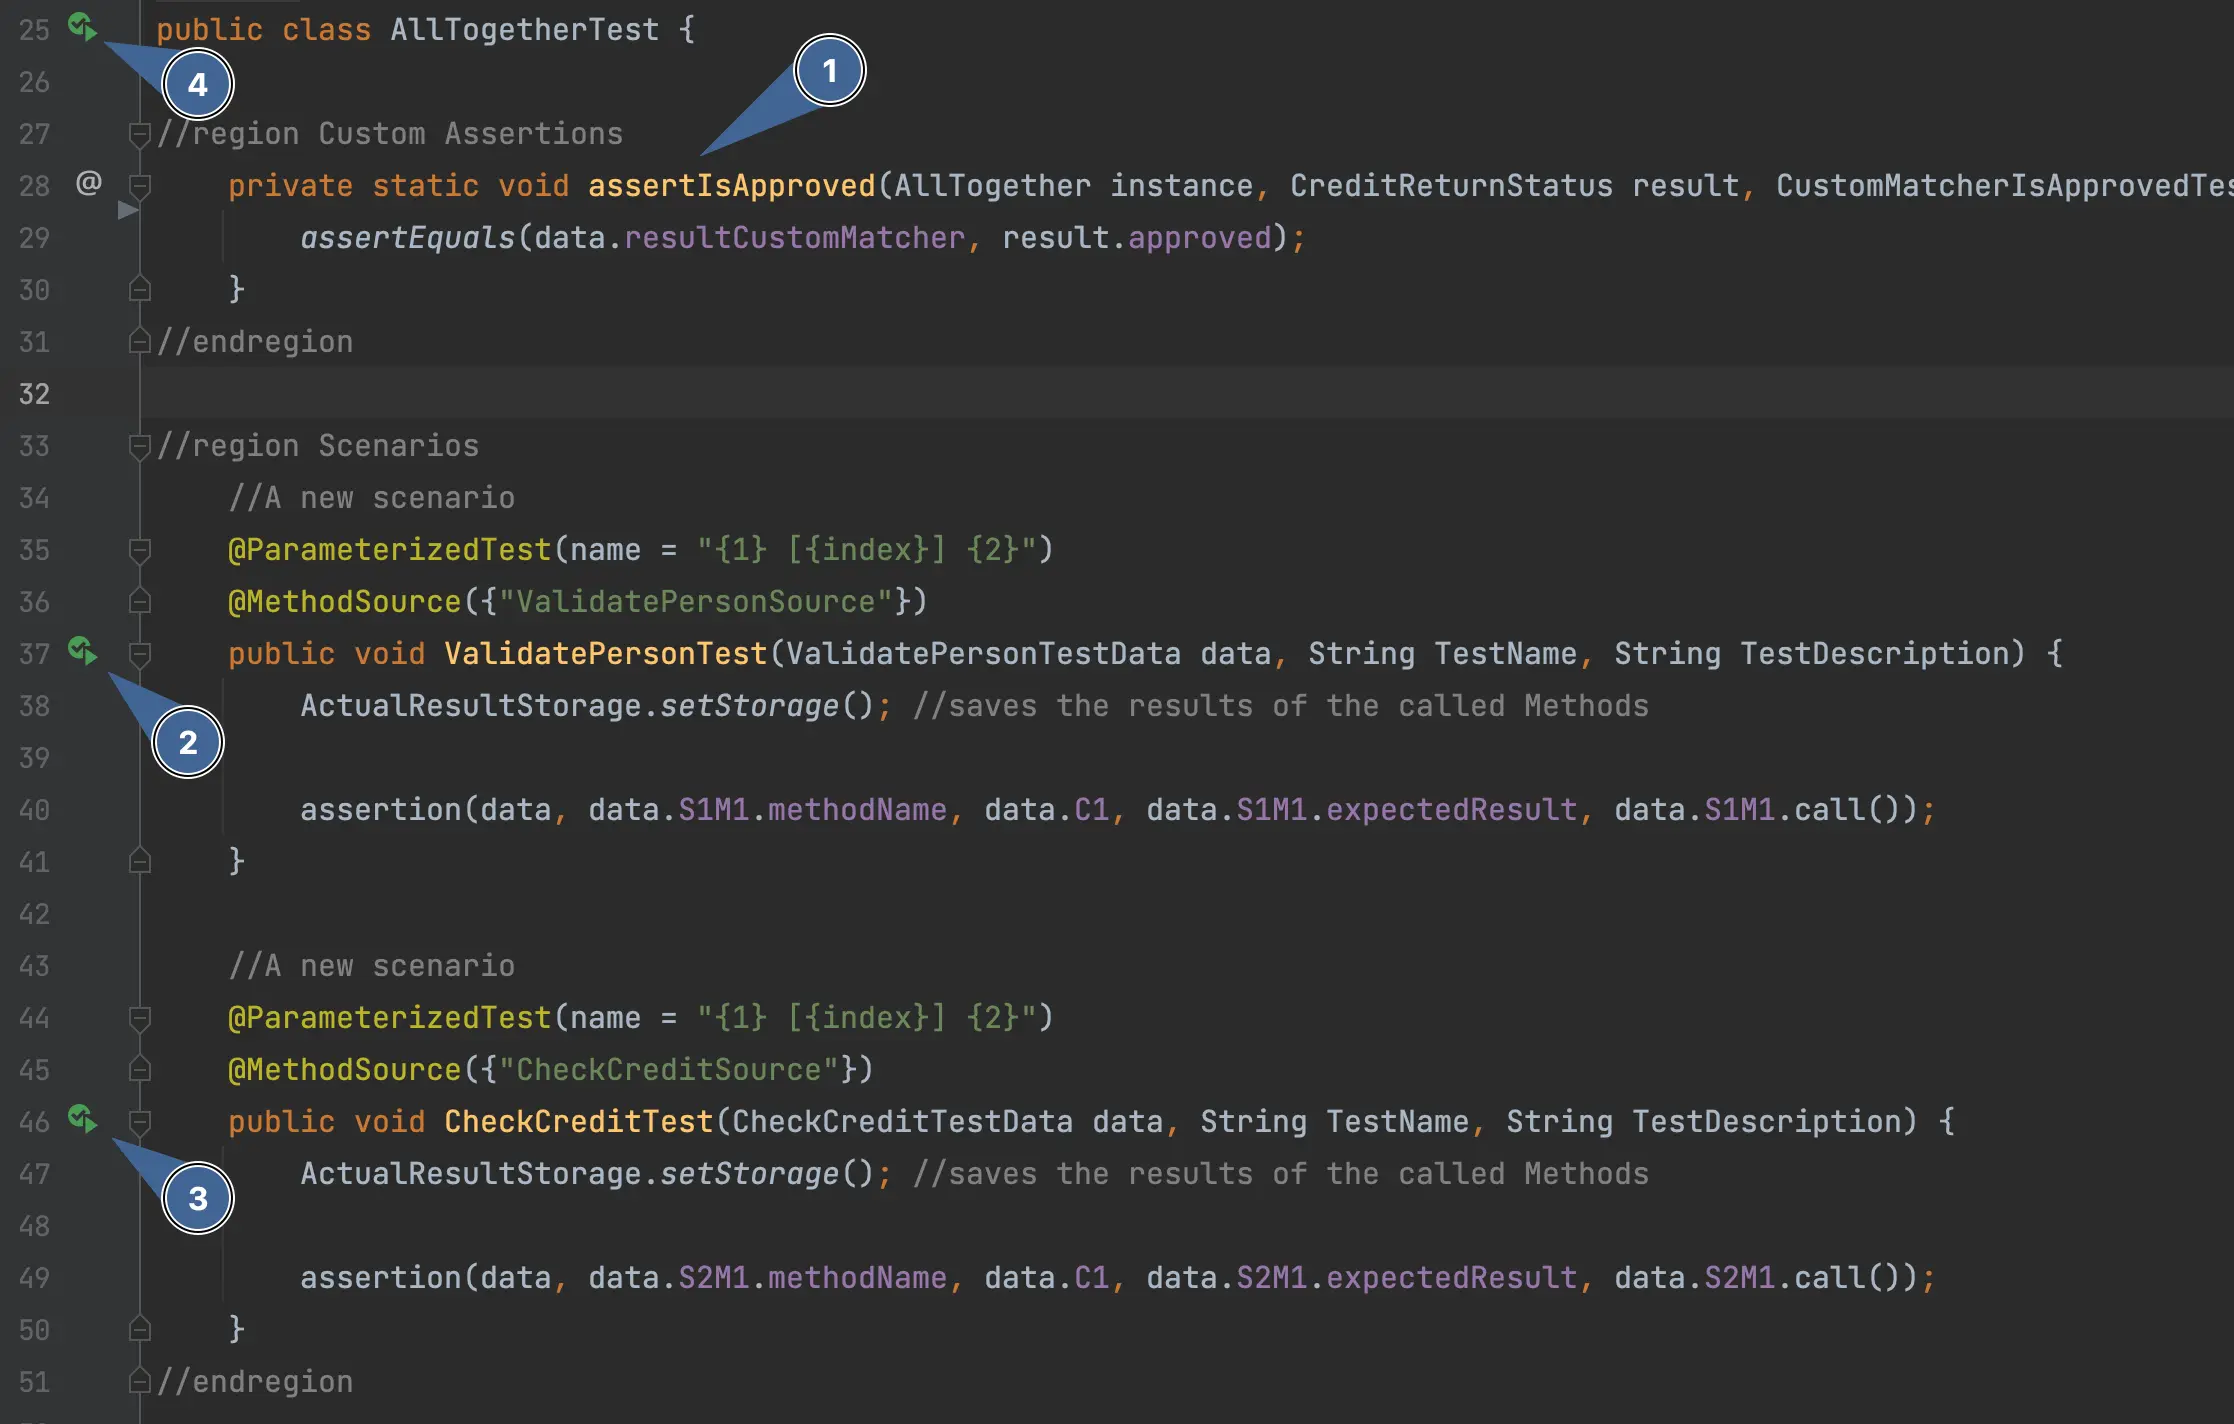
Here’s the Custom Assertion we configured.
We can run the
ValidatePersontest scenario in isolation.We can run the
CheckCredittest scenario in isloation.You can run all test cases (Scenarios and Methods) by using the run button next to the class name.
Run Test
And with that, we can run out test. We’ll run all Scenarios by pressing the button next to the AllTogetherTest class name.
And this is what we see.
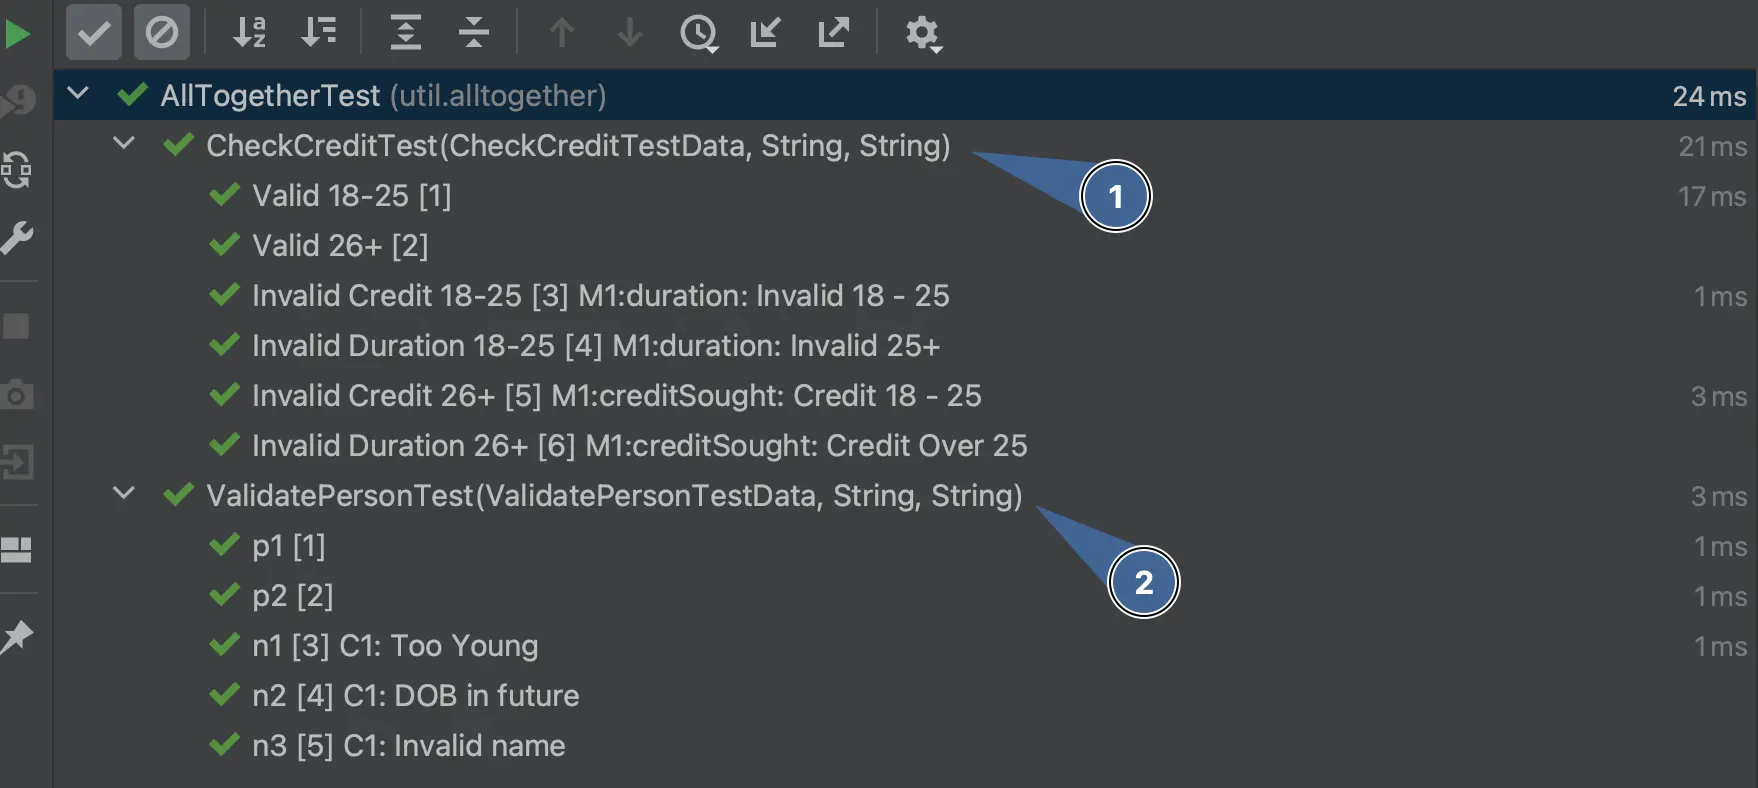
The CheckCreditTest has run. Notice how all of our renaming auto-documents the output (and the Test code).
The same applies for the ValidatePersonTest.
Conclusion
We have shown how we can build a tailored set of test cases with minimal effort. Once you’re used to DevMate, this will take not more than 10 minutes.
The test and test cases are very nicely broken down into two logical scenarios.
Anyone who would look at this test definition can understand it without having to look at any code.
Could you code this as fast by hand? Possibly but very likely not. But imagine looking at your code in a month or a year. In that case, you’ve got to figure out the requirements and tests from the code. Certainly nowhere near as clear as viewing the DevMate configuration.
We’ve shifted the emphasis from writing code to thinking about the requirements, documenting them through the use of the DevMate editor, automatically generating the right number of test cases and, finally, generating the code automatically. That’s a powerful set of benefits for the present and the future.